Objective
I want to give first my public website a more professional look and feel.
Next, I want to better organize my documentation and manage my knowledge.
I want to automate the management of my infrastructure via scripts.
I also want to start by creating an application development and deployment environment on my home server.
For now, I only want to provide a source code Git repository manager, a build server, and a binary registry as central tools.
Result
1 - Upgrade public website to a professional look and feel
I started by examining and comparing the layouts of many existing websites on the internet.
I also read numerous reviews discussing and comparing website layouts,
and learned about the presentation standards used for public-facing websites on PCs and mobile devices.
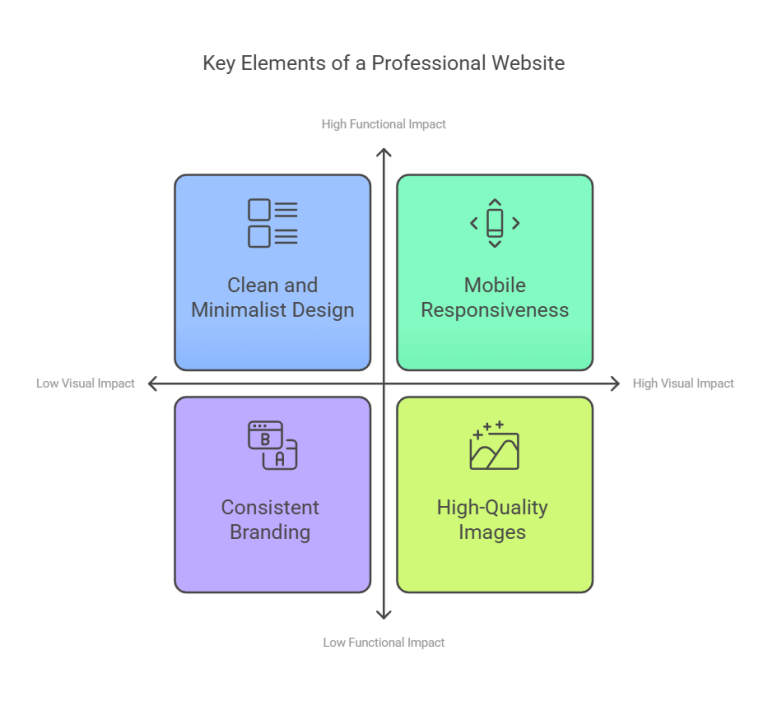
In my opinion, the two most important qualities for public-facing layouts are:
- easy-to-use functionality
- visual appeal
I opted for a layout similar to that of the VRT NWS
website.
This layout has a fresh, uncluttered look and is also easy to use on both desktop and mobile devices.
Next, I searched for information to implement this look and feel.
I still had a lot to learn, especially in the area of visual appeal:
- more advanced use of CSS and Tailwind CSS:
responsive positioning and sizing of elements,
use of absolute, relative, and flexbox layouts,
dynamic styling with calc() in CSS,
use of clipping, overflow, and aspect ratio for images and videos - access to royalty-free videos, photos, illustrations, and backgrounds:
I now have a list of free sites that collect these useful elements - better organization options for Hugo layouts and shortcodes
(this made maintaining my site much easier)
Finally, I also explored available services for analyzing and tracking website traffic.
“Google Analytics” or “Umami” are often chosen as free solutions.
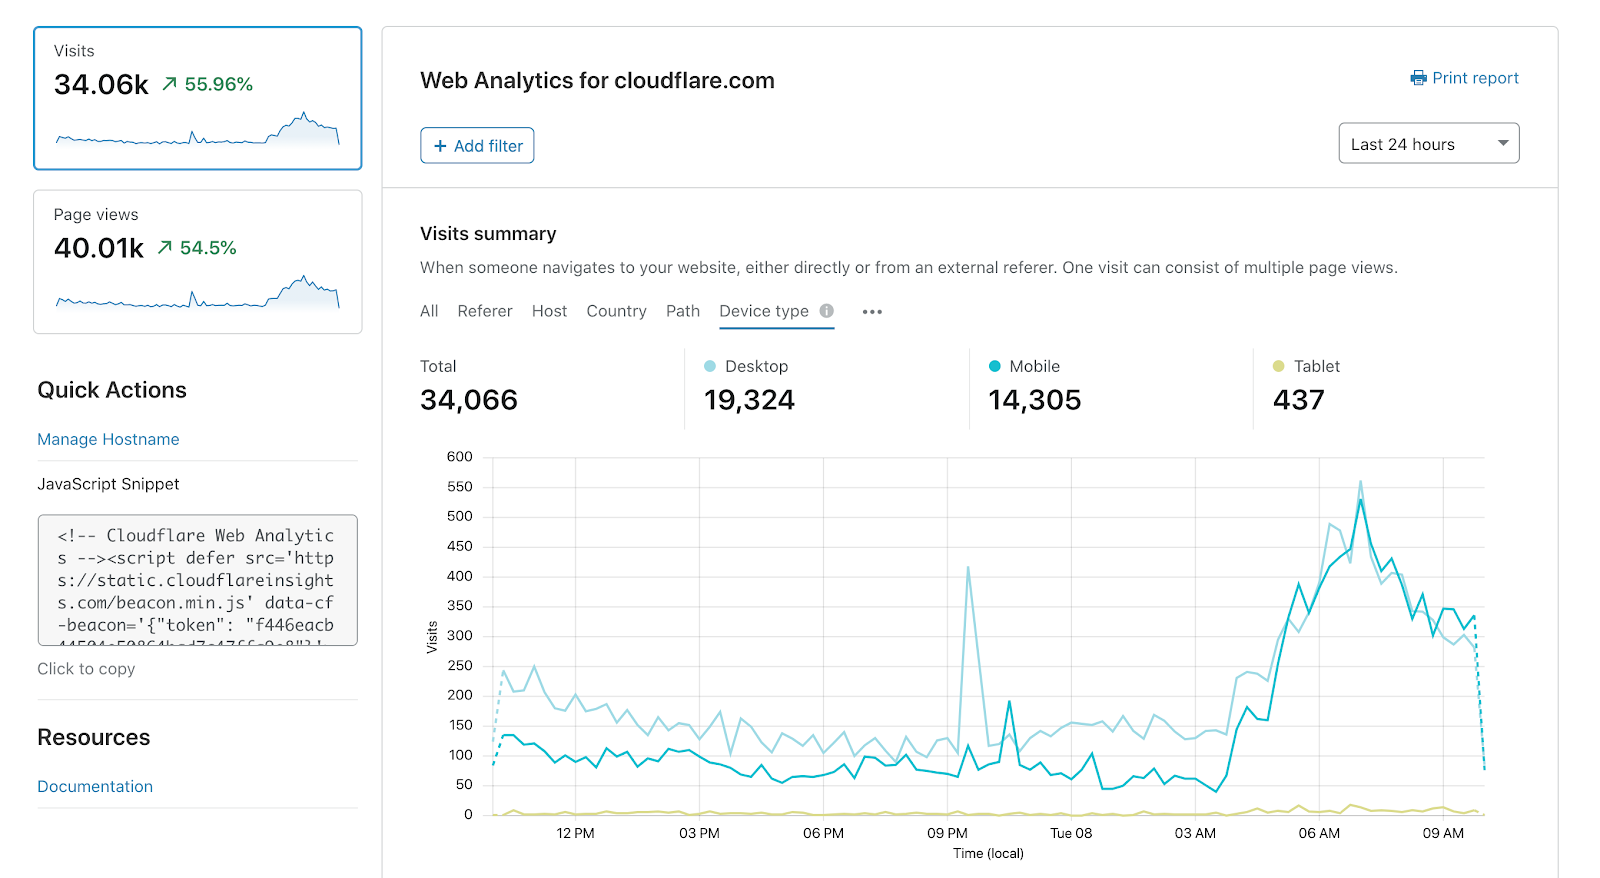
Because I already hosted my website on Cloudflare,
I ultimately chose Cloudflare’s free “Web Analytics” service.
After configuring this service, I can now easily track the following metrics via a dashboard:
page view history, device OS, and browser used by visitors, etc.
2 - Simplify knowledge and documentation management

While carrying out my computer projects, I learned a great deal about computer technology.
I found most of my information through Google search and YouTube videos.
I maintainzd all the references for good information sources and created my own documentation using Markdown files.
Because the volume of information is becoming very large and difficult to structure in files,
maintaining/expanding it and retrieving information has become very difficult.
Therefore, I sought a different approach with software support to simplify knowledge management and documentation creation.
For this, I brought all the information already available together in categories.
This took me a lot of time and effort.
After thorough research, I opted for the “Obsidian” software (versus Notion, Capacities).
The most commonly used standard approach by researchers is the “Zettelkasten” method.
However, developers and devops tend to use a more personalized approach with their own structure in Obsidian.
This knowledge management is completely new to me, and I choose to start with my own approach.
That’s why I created two Obsidian knowledge bases or “vaults” (abbreviated “OV”):
- “OV-ComputerTech”:
Contains general information about computer technology that I can share with others. - “OV-MyHomeLab”:
Contains specific information about my own software, computers, and network configurations that only I can access.
To make these Obsidian Vaults accessible everywhere and to maintain backups,
I created git repositories for these vaults.
New knowledge will henceforth be stored in these Obsidian vaults,
and existing information will gradually be incorporated into these vaults as well.
3 - Simplify the installation of server software
In previous projects, I manually installed Proxmox as OS on my NAS/Home server.
Afterward, I also installed the LXC container “nas-fileserver” and the virtual machine “LinuxMint” on this “proxmox01” node.
In this project, I want to install several new LXC’s with software installed
which will be used including for the development and deployment of custom applications:
“home-pvehelper”, “home-utilityserver”, “home-opsserver”, “home-devdepserver”, “home-testappserver”, and “home-prodappserver”.
Later, I will also reorganize the existing “proxmox01”, “nas-fileserver”, and “LinuxMint”,
and rename them to “home-pve”, “home-fileserver”, and “demo-LinuxMint”.
I will use an agile approach in the following posts
and implement an IDP (Internal Developer Platform) in small steps that immediately add value.
See Architecture of my home server
for the situation after this post.
Because this is very repetitive work, I looked for a way to automate software installation.
First, I implemented an improved LXC Template “templ-ubuntu”.
To this end, I first learned the posibilities of “Bash Scripting” in much more detail.
I created bash scripts to create, destroy and cloned a lxc container using proxmox “pct” command.
Next, I needed to find a way to install additional software more easily.
In “templ-ubuntu,” I installed “Curl”, “Docker”, “Stow”, “Git”, and “Zsh” via new bash install scripts.
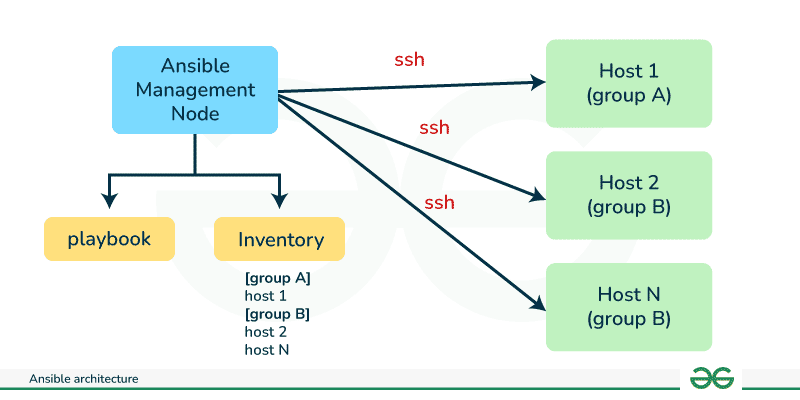
I first installed the “Ansible” software on the “proxmox01” node (later called “home-pve”).
Using the “templ-ubuntu” template, I created the “home-devdepserver” server.
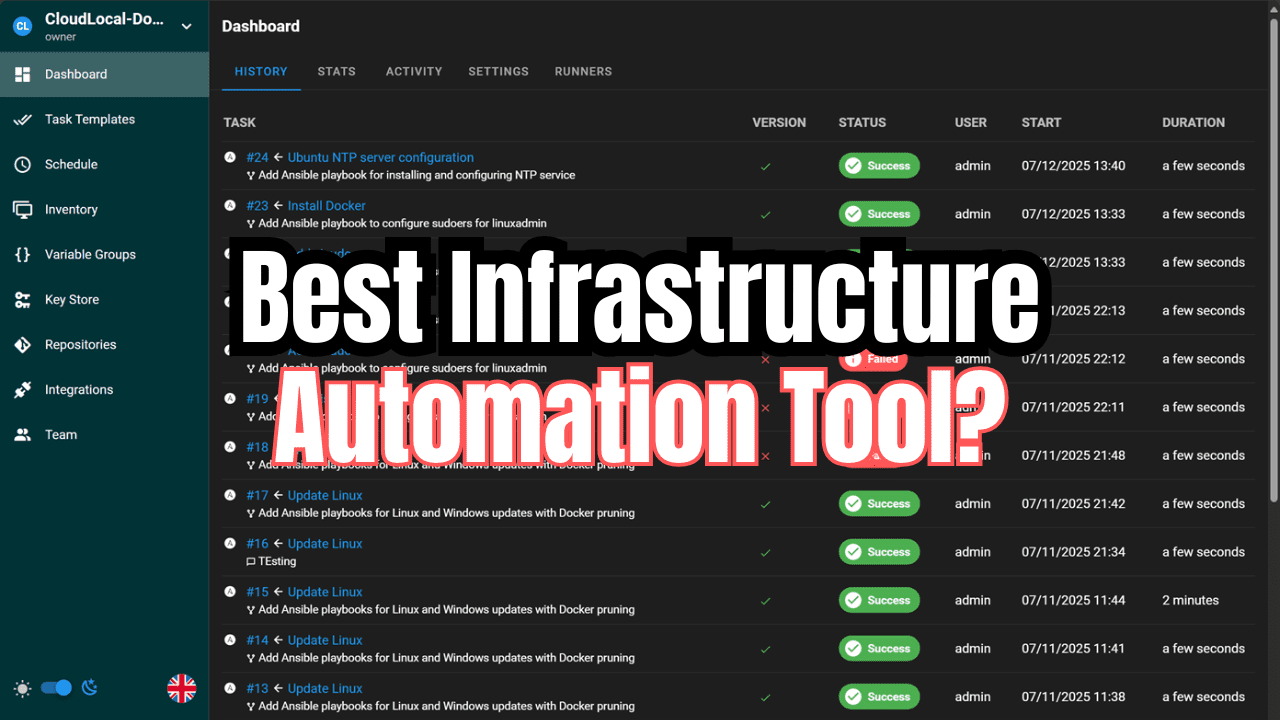
Then, I installed the “Ansible” and “Semaphore” software via scripts on this “home-devdepserver”.
To do this, I first learned the syntax and capabilities of “Ansible” and “Semaphore”.
To install lxc containers and software, I used “ansible-pull” and “ansible-playbook”,
storing the playbooks in a git repository.
Finally, I manually installed the “LinuxMint” software on a new “demo-LinuxMint” VM via the Proxmox web interface.
4 - Simplify referencing services and applications in home network
First, I wanted to give servers in my home network a logical hostname so I could easily refer to them.
Because I didn’t want to host my own DNS server, I used subdomains of my registered public domain name.
For my registered domain name “robertthecoder.org,” I linked subdomains as logical hostnames to private IP addresses.
Since these are private IP addresses, they are only accessible within my local network.
To easily distinguish these subdomains for private IP addresses from other subdomains,
I always prefix them with “home-”.
To easily access all my services and applications,
I created my own home dashboard/portal with links organized into groups.
For the implementation, I chose the popular and free “Homarr” software
(versus Homer, Heimdall, Glance, Homepage, Dashy).
I also gave this server the DNS name “home-utilityserver.robertthecoder.org”.
Most services and applications require a password for access.
To manage these passwords, I’ve been using the free version of “Bitwarden” (vs. “KeePassXC”).
However, I’m now switching entirely to the free community version of “Passbolt”.
I installed Passbolt on the home-utilityserver lxc on my home server in my home network.
5 - Server tools for developing and deploying web apps
My Windows development PC already had “Git,” “VSCode” with “Git Graph,” and “MSEdit” installed.
I also installed “Docker,” “Podman,” and “Portainer” on my Windows PC.
In previous projects, I’ve used the public github.com site.
For the development and deployment of my own applications, I want to use the Git repository manager.
Because I want to host this Git repository manager myself on my home server,
I compared popular software: “GitLab - Community Edition” and “Gitea - Free Edition”.
I first learned the basics of GitLab on the public gitlab.com site.
There, I learned not only the basic Git commands but also the additional GitLab functionality.
A simple HelloWorld application was created and saved using a GitLab CI pipeline.
A container image was created for this example application using Docker,
which was then stored in the Gitlab Container Registry.
Because this GitLab software is resource-intensive and offers too extensive functionality for my needs,
I ultimately opted for the “Gitea” software.
Gitea is a lightweight GitHub alternative, specifically designed for self-hosting and includes:
- “Gitea” (vs. “GitLab”, “GitHub”) as a source code repository
- “Gitea Actions” (“GitHub Actions” alternative, vs. “Gitlab CI & Runners”, “Jenkins”) as a build server
- “Gitea Package Registry” (vs. “Gitlab Registry”, “Nexus”) as a registry for binaries and OCI images
In my “nas-devdepserver” environment on my home server I have installed “MSEdit”, “Docker”, “Podman” and “Portainer”.
I now also installed the latest free version of Gitea.
On the local Gitea server, I first created one group “robertthecoder” (my “company”) on the root level.
In this top group, I created 3 sub-groups: “app,” “util,” and “example”.
From now on, projects will always be created in one of these subgroups.
So in this section I installed the Gitea software alongside Semaphore on “home-devdepserver”.
I also gave this server the internal DNS name “home-devdepserver.robertthecoder.org”.
6 - Installation JetKVM

The IP-based KVM from JetKVM was only now delivered (see blog post from October 1, 2025).
This KVM was connected to my home server and tested.
I will use this JetKVM later to completely reinstall the existing “proxmox01” and “nas-fileserver”
as “home-pve"and “home-fileserver” using script files.