Objective
I want the following expansions to my home network:
- Smart or managed switch with sufficient 2.5GbE ports:
This will make my entire network fully 2.5Gb Ethernet, providing greater bandwidth;
This will also allow me to completely isolate my guest network and IoT network from my internal network, making it more secure;
I currently don’t have access to the configuration of the ISP-supplied central router;
By placing this switch behind this router, my home network will also be more isolated from this ISP router.
I want the following expansions to my NAS configuration:
- IP-based KVM:
My home server is in a remote location, and I therefore want to be able to manage it completely remotely;
This type of KVM allows me to turn this server on and off, change BIOS settings, etc., from my PC.
I also want to expand my knowledge of Linux and server management:
- Creating a new LXC with a Linux setup to experiment with Linux;
Learning Linux and using useful Linux utility software; - Remote access and management of my servers and network:
Using Terminal software for command-line control and Remote Desktop software;
With this project, I’m completing all my ideas about network and server infrastructure.
In my next project, I want to fully complete my public website and start developing applications.
Result
1 - Smart switch and IP-based KVM
SMART SWITCH

I bought a smart web-managed switch from Sodola with 8 x 2.5GbE ports.
I installed this switch between my ISP router and the rest of my home network.
Then I changed the password and IP address of this switch.
Network bandwidth/speed (in Mbps) is different from network latency/ping (in milliseconds).
By installing this switch, my entire home network (LAN) can operate with 2.5GbE bandwidth on CAT5E cabling.
This upgrades my network bandwidth from 1 Gbps = 128 MBps to 2.5 Gbps = 320 MBps.
Only my internet connection (WAN) currently has a reduced bandwidth of 150 Mbps/15 Mbps (19 MBps/2 MBps) due to my old ISP contract.
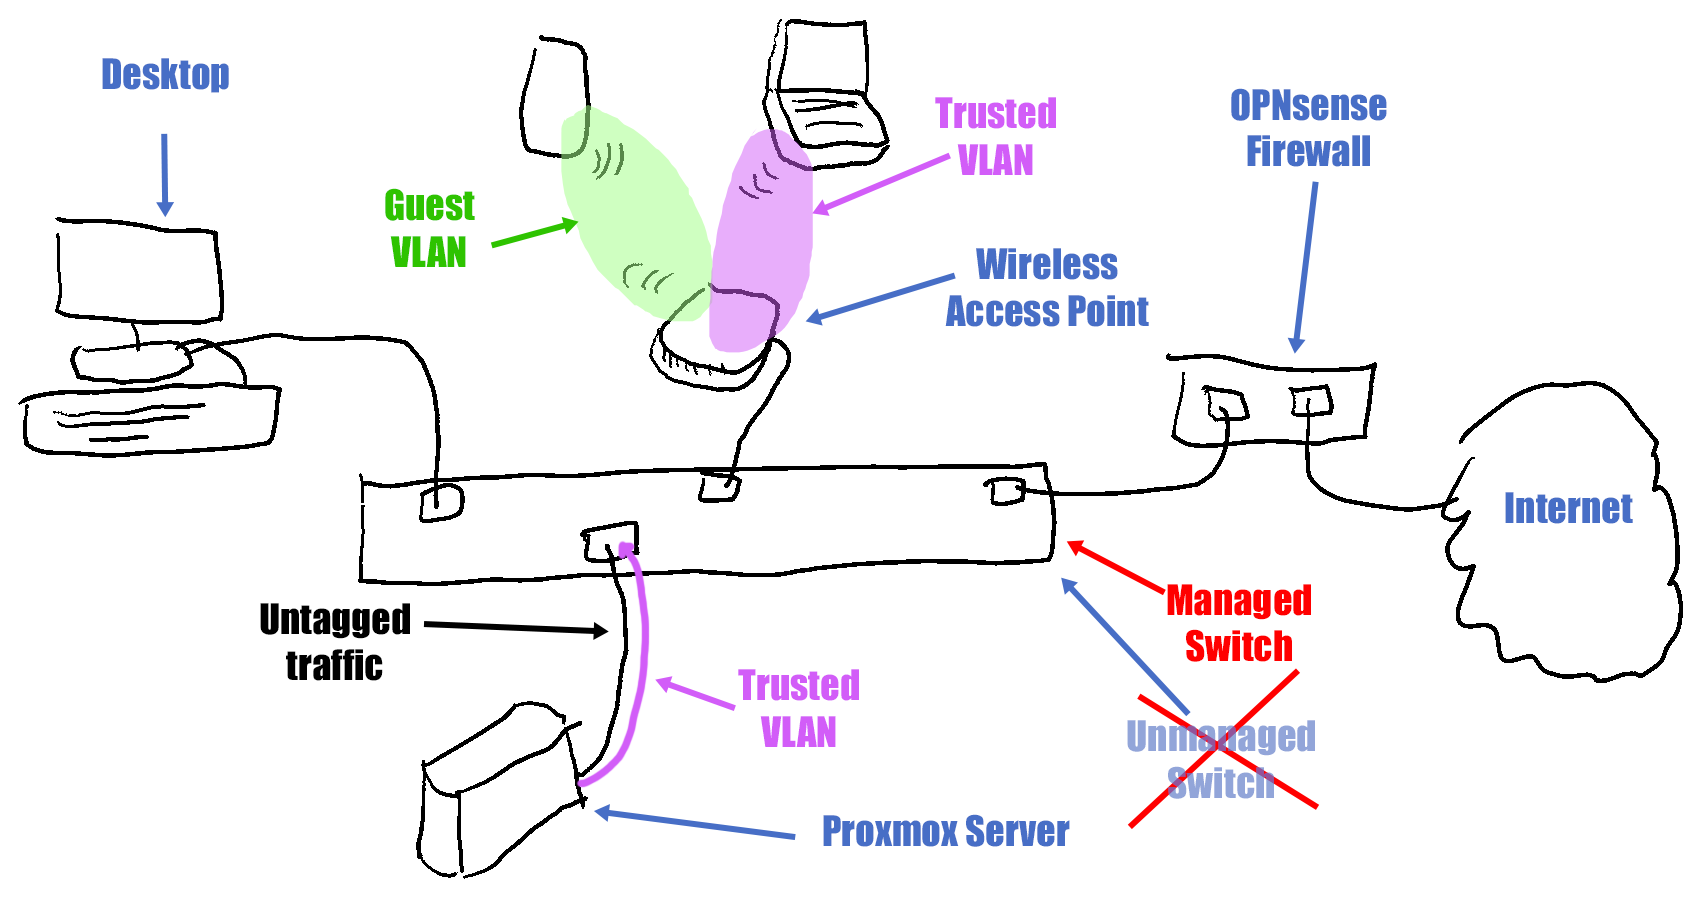
Afterwards, I modified the smart switch configuration to configure VLANs:
(1) Management VLAN (VLAN 1) used by routers and switches
(2) Trusted VLAN (VLAN 10) used by internal PCs, laptops, and servers (with full access)
(3) IoT VLAN (VLAN 20) used by smart devices and cameras (Internet of Things)
(4) Guest VLAN (VLAN 30) used by visitors (with only internet access)
For now I only created a Trusted and Guest VLAN.
I created a “Guest Wi-Fi Network.”
This allows visitors to log in using a separate Wi-Fi name and password.
They then have access to the internet through my LAN,
but the rest of my LAN and machines remain hidden and inaccessible.
USB & ETHERNET ADAPTERS
My home server already has a 2.5GbE port, but my Windows PC only has a 1GbE port.
Therefore, I bought a “USB-C to Ethernet” (for 2.5Gb) adapter and a “USB-A to USB-C” (for USB 3.0) adapter.
I then installed these adapters on a USB-A 3.0 port (dark blue, max 5 Gbps) on my Windows PC.
This way, my Windows PC now also has a 2.5GbE connection.
I also used these adapters to create a second 2.5GbE connection on my home server (via a USB port).
My Sodola switch also supports “link aggregation” via LACP (IEEE 802.3ad), also known as trunking, bonding, or teaming.
Link aggregation combines multiple physical network connections, such as Ethernet ports, into a single logical link
to create a higher-bandwidth network connection between two devices.
This process increases throughput and provides redundancy because traffic can be distributed across multiple active links.
If one link fails, the others can maintain connectivity.
However, for link aggregation to function correctly, both devices at either end of the connection (in my case, the switch and NAS)
must support link aggregation with the same configuration mode (e.g., LACP).
My home server is a budget-friendly “MINIS FORUM UM350 Mini PC AMD Ryzen 5 3550H” (€230)
with Proxmox software (Debian-based) installed.
With Proxmox, ports on Linux systems can be combined (port aggregation) by configuring a linked interface.
However, it remains to be seen whether this older hardware supports LACP.
Because I don’t have an immediate need for linked aggregation on my home server (with two parallel 2.5GbE connections),
I haven’t investigated this further.
IP-BASED KVM
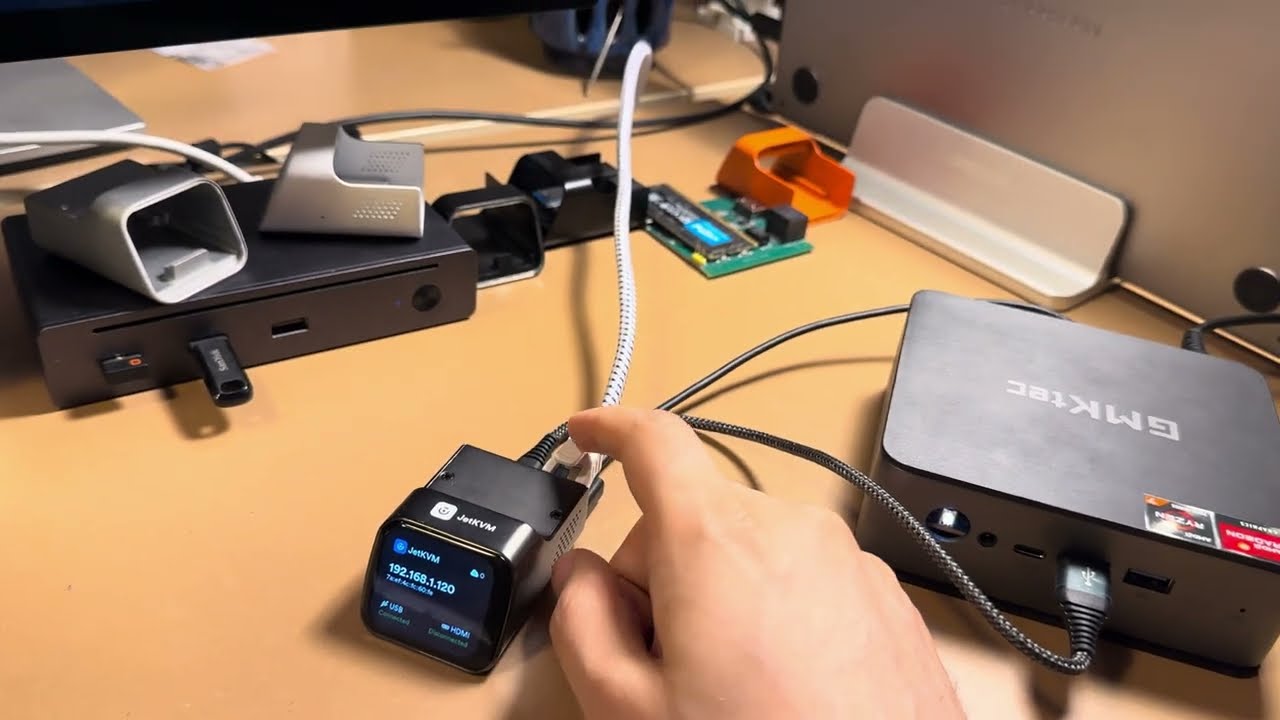
I bought the JetKVM IP-based KVM through the Kickstarter website (crowdfunding).
Due to President Trump’s tariff policy and the war in Ukraine,
the delivery from Shenzhen, China, is significantly delayed.
The home delivery still needs to be made, but I’m being kept well-informed by “JetKVM Shipping”.
Therefore, I can only install the KVM and connect it to my NAS/home server later.
2 - Expand your Linux knowledge

LINUX COMMANDS
I want to be able to use Linux easily in different situations:
WSL on a Windows PC, Proxmox/LXC on my home server, and a Linux (virtual) machine.
Because there are several Linux distros,
I want to try out Ubuntu and Fedora to familiarize myself with the two most important Linux distro families.
Ubuntu is from the Debian family (with apt-get/apt as the default package manager),
and Fedora is from the Red Hat family (with rpm/yum as the default package manager).
First, I wanted to learn all the important Linux commands.
Therefore, I installed “FedoraLinux-42” and “Ubuntu-24.04” in “WSL2” on my Windows 11 desktop PC.
Using the “Windows Terminal”, I could then access the bash shell in these Linux distros on WSL.
I compiled the commands I studied into a summary:
Cheatsheet for Linux commands 👆
On my home server, I installed the popular “LinuxMint-22.1 Cinnamon Edition” (vs. “ArchLinux”) distro in a separate VM.
Using the provided console in the proxmox web app, I could execute shell commands via the browser on my Windows PC.
When learning Linux commands, I paid special attention to package managers:
“apt-get”/“apt” (for Ubuntu), “rpm”/“yum” (for Fedora) as package managers,
and “nix” as an additional (declaative and transactional) package manager for all distros.
I installed the “nix” package manager in Ubuntu,
and then used nix to install the “tmux” software in Ubuntu.
Windows now also has a package manager to more easily install and upgrade Windows applications.
Use the “winget” command in CMD or PowerShell (called “App Installer” in the Microsoft Store) for this.
Using “winget,” I installed “VideoLAN.VLC” and “abdenasser.NeoHtop” as Windows applications.
Microsoft has released a new free and open-source command-line editor, “MSEdit” (Microsoft Edit).
This text editor is very good and works on Windows, Linux, and macOS (compared to Notepad on Windows and Nano on Linux).
You can use this software (vs nano, vim) on all systems to create scripts.
See Cheatsheet for Windows commands 👆 for more information about Winget.
LINUX UTILITIES
I then customized the Linux shell in my terminal:
- “zsh” (vs. “bash”, “fish shell”, “nushell”): a more productive terminal shell
- “zinit” as a plugin manager for zsh
- “powerlevel10k” (vs. “Starship”): customization of the shell prompt
- numerous zsh plugins, aliases, and zsh configuration options
After that, I was introduced to the following console utility software:
- “fastfetch” (vs. “neofetch”): overview of system information
- “htop”, “tmux” (terminal multiplexer)
- “curl” and vscode extension “REST Client”: CLI access to web services;
“jq”/“yq”/“xq”/“jqp”: filtering and formatting support for JSON, YAML, and XML data
WSL SUPPORT for Linux GUI applications
“X11”/“X.org” and the newer “Wayland” are display protocols,
used underlyingly by Linux window managers (GNOME, KDE Plasma, Xfce, MATE).
WSL2 in Windows 11 natively supports Linux GUI applications (using X11 or Wayland).
With WSL2, Linux GUI applications feel native and natural on Windows.
We can now launch Linux apps from the Windows Start menu and pin them to the Windows taskbar.
In addition, we can use Alt+Tab to switch between Linux and Windows apps and copy and paste content between them.
See Cheatsheet for Windows commands 👆 for more information about WSL.
I learned to use Linux GUI applications and Windows GUI applications side by side on my Windows PC.
First, I installed several GUI applications, including nautilus and x11-apps, in Ubuntu.
In the Windows “Start” menu, I found a new “Ubuntu” group under “All.”
In this group, I could find the installed Linux GUI applications (in Ubuntu on WSL).
The “nautilus” app is a file explorer for Linux.
3 - Remote access to servers
I want to be able to easily control and manage all my servers and machines remotely from a single machine.
Especially because machines can be located in different physical locations.
My goal, therefore, isn’t so much to provide remote assistance (over the internet),
but to simplify server management within my home network.
REMOTE TERMINAL (Command-line remoting tools)
This remote management is almost always done via the command line via SSH and SFTP/SCP software.
This is secure client-server software, and an SSH/SFTP server must be configured on the remote machine beforehand.
See Cheatsheet for SSH and SFTP usage 👆 for more information.
- Popular SSH client tools on Windows (remote machine control):
“SSH” in shell, “PuTTY” (GUI for SSH, Telnet, SFTP), vscode extension “Remote Development” (SSH, WSL, DevContainer) - Popular SFTP/SCP client tools on Windows (exchanging files with a remote machine):
“SFTP” & “SCP” in shell, “WinScp”, “FileZilla”, vscode extension “SFTP”
(These softwares all use underlying SSH connections) - More advanced tools for more extensive SSH session management on Windows (multiple and/or permanent sessions):
“mRemoteNG” (or “Remmina” for Linux), “MobaXterm”
(Free for personal use only; supports SSH, Telnet, SFTP, built-in X-server)
I ultimately chose the “SSH” & “SFTP” & “SCP” software. “Windows/Linux Terminal” and for “PuTTY” and “WinSCP” on Windows.
The vscode extensions “Remote Development” (SSH, WSL, DevContainer) and “SFTP” were also used.
Because I only have a limited number of servers, I didn’t use “mRemoteNG” (or “Remmina” for Linux).
To learn how to use the SSH, SFTP, and SCP protocols, I performed the following tests:
- test “Client [Windows on PC] ===[SSH/SFTP/SCP]===> Server [Linux Mint in a VM on a NAS]”:
Installation and use of SSH server on a Linux Mint VM on a NAS,
and SSH client in Windows Terminal on a Windows PC;
Use of Putty, WinSCP, and VSCode “Remote Development” & “SFTP” extensions as client tools on a Windows PC;
Installing SSH keys on a Linux Mint VM on a NAS,
and using them for passwordless login from a Windows PC. - test “Client [Ubuntu in WSL on PC] ===[SSH/SFTP/SCP]===> Server [Linux Mint in VM on NAS]”:
Installing SSH server on a Linux Mint VM on a NAS,
and SSH Client in Windows Terminal for Ubuntu in WSL on a Windows PC. - test “Client [Linux Mint in VM on NAS] ===[SSH/SFTP/SCP]===> Server [Windows on PC]”:
Installing SSH server on a Windows PC,
and SSH Client in Terminal and VSCode of a Linux Mint VM on a NAS;
Installing SSH keys on a Windows PC,
and using them for passwordless login from a Linux Mint VM on a NAS.
OpenSSH Server on Windows doesn’t work with Microsoft accounts.
A local account or an Active Directory account is required in Windows for SSH authentication.
To test OpenSSH Server on Windows,
I therefore created a special local account for SSH with the “Administrator” account type.
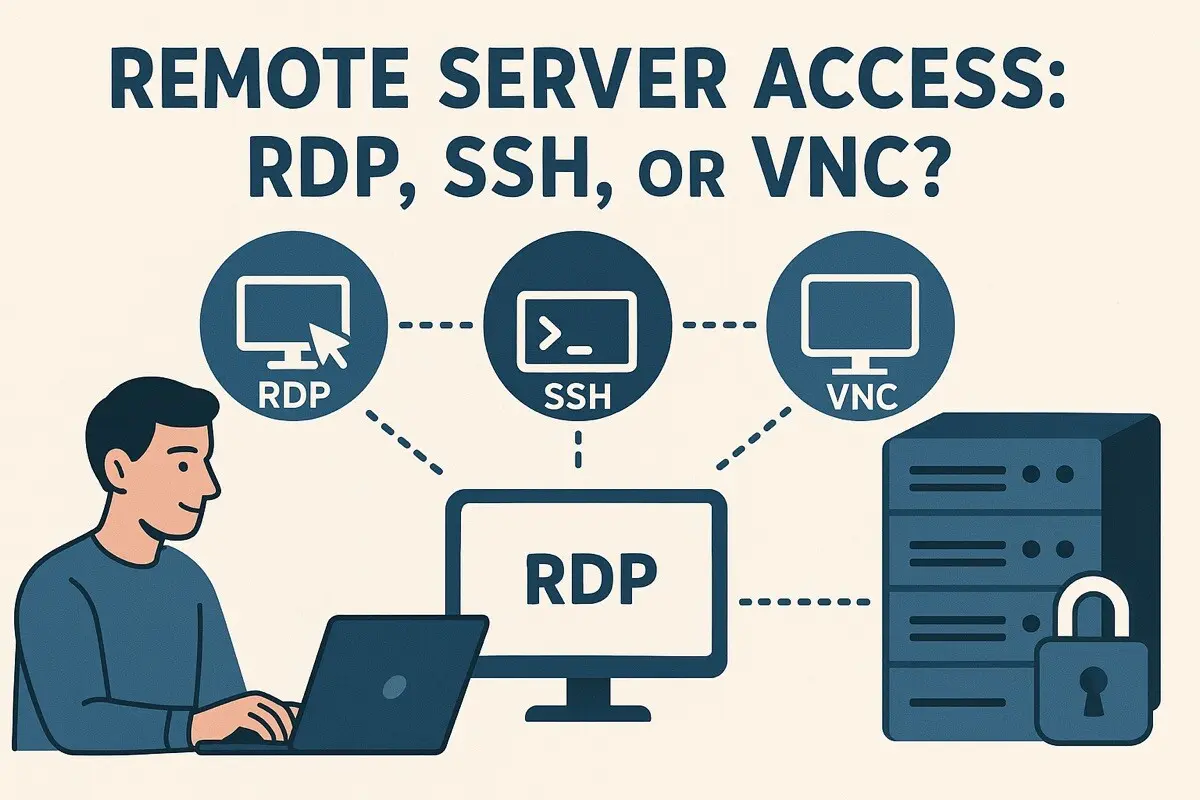
REMOTE DESKTOP (GUI remoting tools)
To try out Remote Desktop software,
I need a graphical desktop on my Linux system.
Because X11 forwarding is very inefficient,
the following software is commonly used for remote GUI access:
“Windows Remote Desktop”, “VNC” (Virtual Network Computing), “Chrome Remote Desktop”, “TeamViewer”, “AnyDesk”, or “NoMachine”.
I first used the automatically installed “Remote Desktop Connection” app (Microsoft RDP) in Windows.
However, this software only works within a local network, and the RDP server must be a Windows Pro machine.
Then I used the free and open-source “RustDesk” software.
This Remote Desktop software can be used on all systems (Windows, Linux, Mac, and Android).
Guacamole is another free and open-source remote desktop software.
Guacamole, however, is web-based, more complex, and better suited for larger enterprises.
I ultimately chose “RustDesk” as my remote desktop software.
Because I only wanted to use RustDesk within my home office (LAN), I didn’t use a RustDesk Server (relay server) in my setup.
See RDP usage cheatsheet 👆 for more information.
To learn how to use RustDesk, I performed the following tests:
- test “Client [Windows on PC] ===[RDP]===> Server [Linux Mint in VM on NAS]”
- test “Client [Linux Mint in VM on NAS] ===[RDP]===> Server [Windows on PC]”
4 - Simplify management of all software configuration files
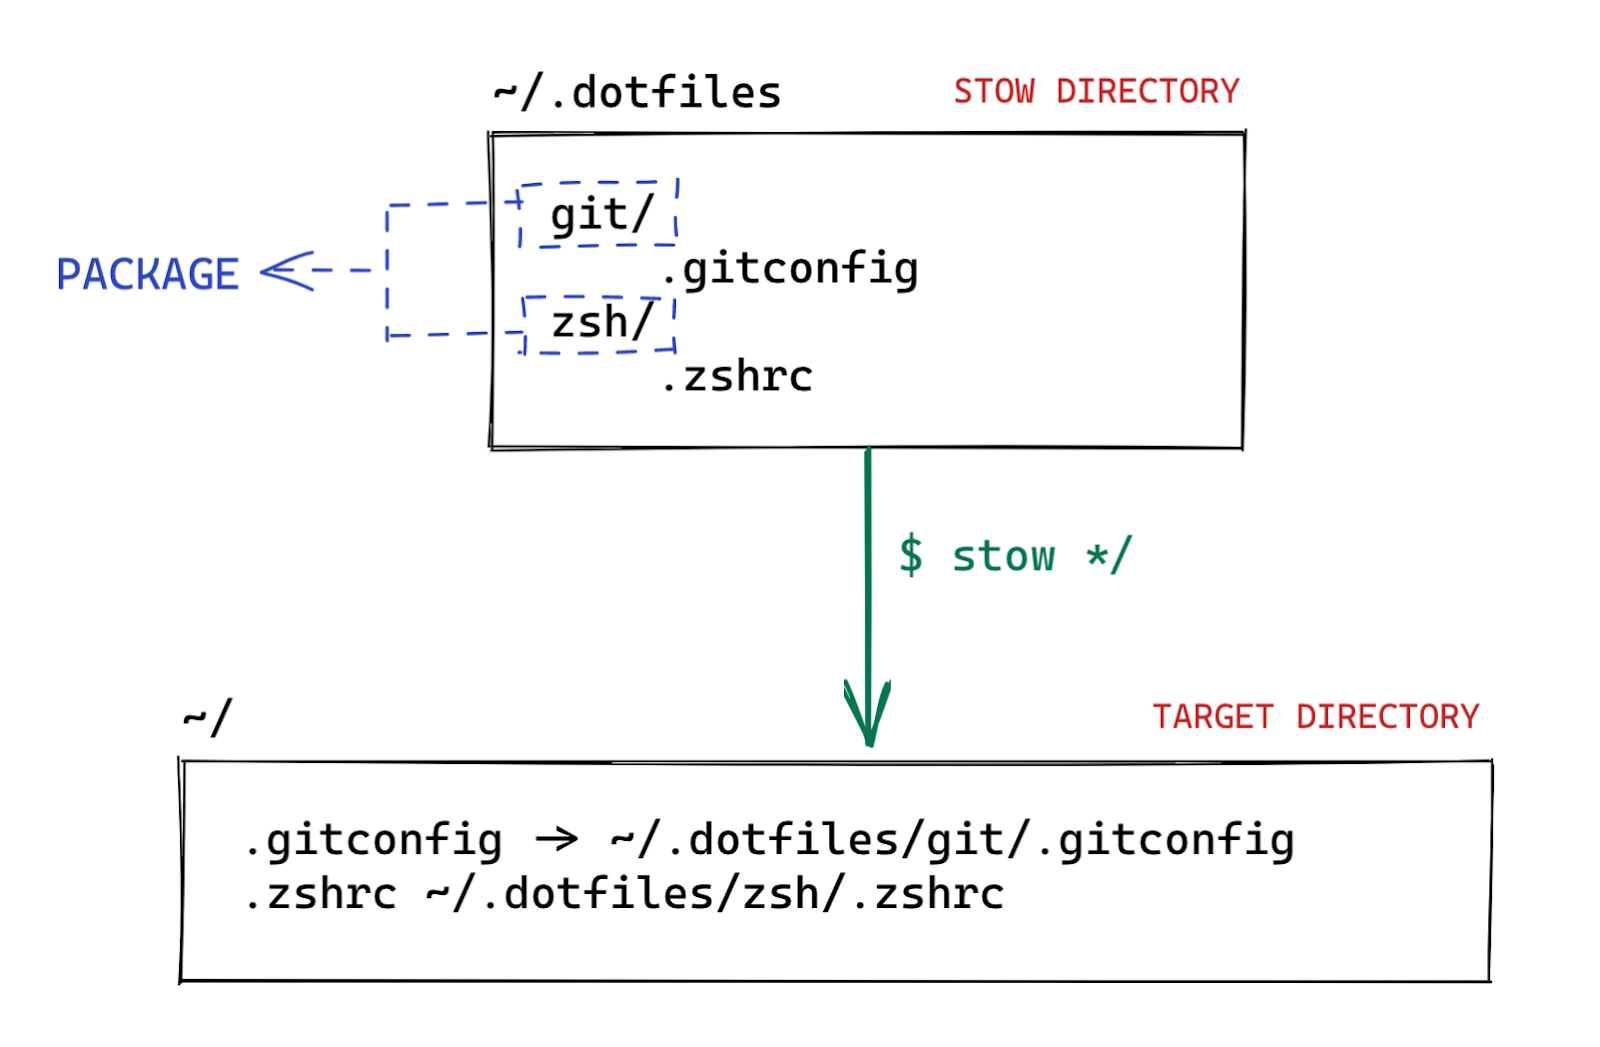
In Linux, all software configurations are stored in dotfiles.
To keep these dotfiles consistent across all my computers,
and to easily migrate to new/old configuration versions,
I now use the “GNU Stow” software (vs. yadm) and a git repository.
The stow software easily replaces all configuration files with symbolic links,
which point to these files in the same “.dotfiles” folder.
By turning this folder into a git repository,
all software configurations can be easily centrally managed and backed up.